Thursday, May 31, 2012

This girl ROCKS!

One week from today, Red Rubber Designs will roll out the new June stamp releases with a blog hop, scavenger hunt, and of course prizes!  But for now, I still have one more opportunity to share a project made with the May spotlight stamp - Hey Life.

Earlier this year, my niece and her husband adopted this adorable girl from Russia.  I have not had the pleasure of meeting her yet, but pictures of her with her new brothers just make me smile.  This was one of the first pictures I saw of her, after they brought her home, and I just love the way she is rockin this outfit!!  I have created a rock-n-roll picture frame to go with the picture.

I used the guitar from the Hey Life stamp set and a technique similar to the masterboard technique from last week's Tuesday Tutorials.  I stamped several guitars in Noir Palette Ink around the frame - turning them in different directions.  Then I did the same with the flower stamp from the Place in My Heart stamp set in Claret Palette Ink.  I created flower centers with glue and pink glitter and then added some more random glue dots with holographic silver glitter.

I used pink and black plaid paper from the Uptown Girl paper stack for the background behind the picture and a die-cut flower.  Added more silver glitter to the edges of the flower along with a little "Girlz Rock" resin center, and finished with another silver glitter flower for the corner.

I can't wait to see her and give her this picture for her very cool new room!

Friday, May 25, 2012

Warmest Wishes Card

Have you checked out the Tuesday Tutorials on Red Rubber Designs Blog?  RRD has a great design team with very diverse styles and strengths, and each week there is a technique, project or stamping "how to" featured on the blog.  These tutorials are also available for FREE download on the Red Rubber Design website.  This week's tutorial was "how to create a stamped masterboard".  Louise made it look so easy and fun, so I decided to try it.

I created my masterboard using the stamps from the "All Things in Nature" stamp set and Palette Inks in Charcoal, Beaux Arts Blue, Cognac & Jardin Moss.  Once the masterboard was done, I simply cut a piece to fit my card and added a few embellishments. I used papers from the Willoughby and Reece paper collections and ribbon from the Reece & Woodrowe collection.  I finished it off with some "rivets" made with a dimensional pearl pen.

Wednesday, May 23, 2012

Invitations and Decorations with a little BLING

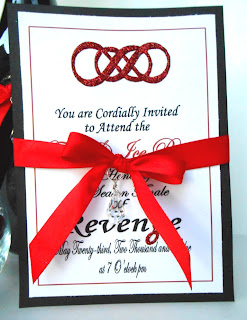
I am a huge fan of the TV show Revenge.  (OK, I'm actually a little obsessed with it)  Since the season finale is upon us, (It will actually air the same day as this post), I decided to throw a little Season Finale viewing party for a few of my fellow Grayson Groupies.  I was inspired by Daniel and Emily's engagement party invites.

I started by creating the invitation on my computer and printing on plain white card stock.  I had pilfered the infinity symbol off the internet and wanted to highlight that.  I used Art Glitter Dries Clear Designer Adhesive and a fine tip and traced over the lines of the symbol and then sprinkled Art Glitter Ultrafine Opaque glitter in Country Red over the wet glue.  I did about 1/3 of the symbol at a time so that the glue was still wet when I added the glitter.  I used the same technique to form the infinity "g" in "Revenge".

For the crystal dangle, I used 2 Connie Crystal Raindrop Dangles (one for the invitation and one for the vase).  I threaded an eye pin through the hole in the crystal, bent the pin so that the eye extended above the top of the crystal and wrapped the long end back around the shaft below the eye of the pin.  Then I attached a large silver tone jump ring.


I tied a bow in a piece of red ribbon.  Then I laid the bow face down across a second piece of ribbon - ran the second piece of ribbon through the jump ring on the crystal and brought that up near the bow.  Then I tied the ribbon in a knot around the knot in the bow so that the crystal dangled below the bow.  Then I brought the ends of the second piece of ribbon around to the back of the invitation and attached the ribbon to itself with double stick tape.  I did not attach the ribbon to the invitation so that it can be slipped up or down or off to read the invitation.  I repeated this process to form a bow and dangle for a black glass vase (found at Hobby Lobby).

I had a lot of fun with this project and getting ready for the Revenge finale, but I really like the bling that the crystals add to the invitation and decorations.  I think they would be great for wedding invitations and decorations!

Monday, May 21, 2012

Distracted by Shiny Beach Glass

Beach Glass
Today our short but wonderful beach vacation comes to an end and we begin the LONG drive home; so I just thought I'd share some shots of the glass pendants that I brought with me to try to promote in area shops.  Distracted by Something Shiny - Beach Glass.
Some are already available in my Etsy Shop.
Flamingos

Hibiscus

Hibiscus Chain

Dolphin
Seahorse


Saturday, May 19, 2012

Dollar Store Candle to Shabby Chic

As a craft-a-holic, I tend to go through Dollar Stores and Thrift stores thinking "what can I make out of that?"  So this project is for all the other thrifty crafters out there that enjoy taking dollar store stuff and making them look like boutique items.

The Supplies:
-Tall pillar candle
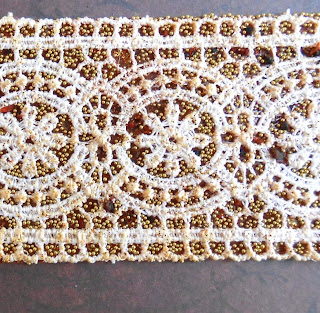
-Wide lace that will go around the candle - this was left over from a spool of lace that I had from Hobby Lobby, but since you only need about 6" or 7", you can probably find this in your stash or possibly the remnant bin at your favorite craft or fabric store.
-Ranger Distressed Inks -Shattered Straw & Antique Linen
-Double sided tape - cut the same length and width as the ribbon
-Pastry Liners or Cupcake Liners
-Art Glitter Elements - #26 Redlands
-Art Glitter Small Beads - #80 Solar
-Art Glitter Ultra Fine Opaque Glitter - #65 Old Gold
-Soft Brush or Make-up Brush
-Ornate Cameo or Pendant Blank - this, again, was from my stash, but you can probably find something at a thrift store, yard sale, or check out the findings from Vintaj.  Just be sure it has an opening at the bottom to attach your crystal.
-Prima Flowers
-Connie Crystal Raindrop crystal
-Eye Pin
-Jump ring
-E6000 glue

1.  Start by measuring your lace around the candle and trim so that the ends will meet smoothly.  (at the back of the candle)  Lay the lace on paper or a protected surface and lightly dob the Distressed Inks on the lace to give it an aged look - Not too dark or there won't be enough contrast between the lace and the background that you'll be forming next.  (Optional step - my Pendant was antique silver and I wanted to "tarnish" it, so I dobbed the Distressed Inks on it as well)

2.  Measure and trim your double stick tape to the same size as your lace.  I used Red Line Tape that comes in a 8" x 11" sheet.  Remove the paper backing on the tape and carefully position the tape on the back side of the lace.  Leave the red protective plastic in place.

3.  We're going to do three layers of "inclusions" into the face of the tape. The first is the Art Glitter Elements.  Pour some out into a pastry liner or cupcake liner.  Beginning at one end of the lace, press the lace face down into the Elements.  Lift and repeat all the way down the length of the lace. Elements are very chunky and some of the chunks are too big for this project.  Brush the larger pieces off the lace with a brush or your finger.  You just want some of the smaller pieces to stick to add texture and deep color.  Pour the excess Elements back into the jar.

The second layer will be Art Glitter Small Glass Beads.  Pour some of the beads into a pastry liner and again press the lace, face down, into the beads, so that they fill in more of the areas where there is no lace.  Tap the lace over the pastry liner to remove excess beads.  Pour the leftover beads back into their jar.

The third layer is the Art Glitter Ultra Fine Opaque glitter.  For this layer, hold the lace, front side up, over a pastry liner or card stock, and pour the glitter over the lace.  The glitter will fill in the areas that the Elements and Beads did not cover.  Use a brush to press the glitter into any remaining exposed tape.  Tap the excess glitter back into the pastry liner.  Use a soft brush or make-up brush to brush off any excess glitter that may have temporarily stuck to the lace.

4.  Carefully remove the red tape liner from the back of the lace, making sure not to pull the tape away from the lace.  Find the center part of the lace that will be the front of the candle and line it up where you would like it on the candle.  Working from the center, out to the ends, gently smooth the lace/tape onto the candle.

5.  Bring the eye pin through the hole of the Crystal and bend so that the eye is about 1/8" above the top of the crystal.  Bring the straight end up and wrap it tightly around the shaft below the eye.  Trim off the excess.  Then us a jump ring to attach the crystal to the bottom of the pendant blank.

6.  Use E6000 to glue a Prima Flower to the center of the pendant.  Once that has set, use E6000 to glue the pendant in place on the lace and add more flowers at the top of the pendant.


Tuesday, May 15, 2012

Father's Day Card

Yes, I know that Red Rubber Designs has other stamps and other new releases, but for some reason, this month, I  keep going back to the Hey Life Stamp Set.  This just goes to show you how versatile this stamp set is!  Today, I'm using the golfer from this set to create a quick Father's Day card.  After all, Father's Day is all about golf at our house.  Actually - Mother's Day was too this year...hmmmm....Anyway, the argyle patterned paper from the "Just Like Dad" paper stack reminded me of a golf shirt with navy trim.  I created "buttons" from Mulberry Meadows Hardware.  "Happy Father's Day" is from the Contemporary Greetings stamp collection (another MUST HAVE) from Red Rubber Designs.

Happy Father's Day!!

Four!!!

Saturday, May 12, 2012

Patriotic Bangle

With Memorial Day coming up and Flag Day and 4th of July not too far off, I thought I'd create a bangle bracelet with some of Red Rubber Designs patriotic stamps.  I started with a wooden bangle blank and used Palette Cognac Ink on a dobber to warm up the color of the wood.  Then I used Palette Moulin Rouge and Beaux Arts Blue around the edges and again used a dobber get bring the color just into the edges of the bracelet face.

Now....let the stamping begin.....I used the Liberty Rubber Stamp and Cognac Ink to create a background - stamping at a diagonal around the bracelet so that the detail of the face and crown show.  Then I added "Bless the USA", "United we Stand" and "Some Gave All" from the United We Stand Stamp Set in black.  Both Liberty and United We Stand are from the New Releases for May at Red Rubber Designs.

Stamping on rounded surfaces can be a little challenging.  It works best to have your stamp on an acrylic block.  Hold the bracelet steady and set one edge of the stamp on the bracelet.  Then slowly roll the stamp along the curve - applying steady pressure to get a clean impression.  Don't try to roll it back up to darken the stamp because the odds are your stamp has shifted and your impression will be blurry.

Once the ink was dry, I used a gloss acrylic sealer to protect it.


Wednesday, May 9, 2012

Connie Crystal and Shell Candle Holder

If you've ever been to a beach, especially if you have kids, then you probably have a box, bag, jar or, in my case, ketchup squeeze bottle full of shells.  I ran across our collection the other day and thought it would be perfect for a fun summer candle holder.  This project is super quick, easy, inexpensive and functional....what's not to love?!

You will need the following:
Small glass votive candle holder
Med glass votive candle holder (I got both of these at Hobby Lobby - at 50% off, the pair was less than $2.00)
E6000 Glue
About 1/2 cup of small shells
30 - 40 Connie Crystals in various sizes, colors and shapes.  (I really love the octagon crystals in this!)
I also added some pearls I had leftover from a previous project.


Step 1 - Remove any price tags or labels.  Run a bead of E600 around the bottom of the small glass and place it inside the larger glass.

Step 2 - Begin filling the area between the glasses with shells - filling about 1" up the glass.  Shake the glass gently to get the shells to settle.

Step 3 - Once you have a fairly solid layer of shells, begin adding crystals in a random pattern.  Add pearls, if desired, and some smaller shells.  You want this layer to be primarily crystals so that they catch the light of the candle.  I used a mix of purple, blue, aqua, amber and clear.  The various shades of blue mixed with gold reminded me of a sunset on water.

Once you are happy with the arrangement, add a votive candle and enjoy.  The crystals throw beautiful sparkles of light. Also, since none of the beads are glued in, if you decide you need a bead for a project, there it is.  Why keep your beautiful crystals in a box or drawer, when you can have them displayed in a candle until you need them for something else?!


Tuesday, May 8, 2012

RRD - Tutorial Tuesday

It's Tutorial Tuesday on the Red Rubber Design Blog!  I'm happy and excited to share my first tutorial for the Red Rubber Design Team.  Here's a little teaser of a before and after photo for the project and technique featured in the tutorial:


Want to see more?  I KNOW you do!!  Head over to Red Rubber Design's Blog too see the full project!!

Or head to Red Rubber Designs website for a FREE downloadable version and pick up this stamp and SO MANY MORE while you're there!


Saturday, May 5, 2012

Fairy in a Bottle

I have a thing for bottles....I like to melt them in my kiln and I have been known to buy wine because I like the color or shape of the bottle.  So when my husband saw a very nice blue bottle of a particular adult beverage, he thought 'I bet my wife would like that bottle'.  (sure, that's what he was thinking... ;)  Unfortunately, this bottle design does not work well for melting, so I wanted to find another way to reuse it.  I had seen "Fairies in a Jar" on the internet and decided to make my own version....Fairy in a bottle.

The first step was to cut the bottle.  I have an old fashioned bottle cutter.  There are new ones on the market - I'm not sure if they are easier or not, but if you go to diamondtechcrafts.com, they have lots of information on cutting bottles.  Once the bottle was cut and sanded it was time for the fun part.

First the fairy:  The fairy's body and head are made from white polymer clay. Roll the clay thru a pasta maker on the thickest setting and then trim it to be about 3" square.  Cut the square in half and place an eye pin in the center of one piece of clay, so that the eye is about 1/4" from the top edge and the shaft extends up beyond the clay.  Place the second piece on top so that they sandwich the eye pin - pressing slightly to adhere the two pieces.

Coat the clay in Art Glitter Blue Angel Ultrafine Pearlescent.  Cut a long teardrop shape in  the clay and cover the newly exposed sides in Art Glitter Purple Lame Ultrafine Opaque.  Then gently twist the teardrop into a spiral - the Fairy's body.  Use some of the excess clay to roll a ball for the head - coat it in Blue Angel glitter and put it on the pin.  Spin the head a little bit at this point so that it is lose on the pin - you'll want to be able to slide it off the pin after baking.  Bake the head and body according to clay manufacturer's instructions.

After baking, I didn't feel that there was enough glitter - I wanted the purple to really pop - so I ran a little Designer Dries Clear Adhsive down the edges of the spiral and coated them with more of the Purple Lame glitter.


Art Glitter Bellflower Fantasy Fiber was used to create the hair.  Set a clump of it on a teflon sheet and cover with another teflon sheet and then iron just in the center to bond the fibers.  Glue to the top of her head then put the head back on the pin.  Pull the "hair" back to form a lose, low ponytail and glue in place using more Designer Dries Clear Adhesive.  I just wanted the fiber to create the look of hair and a sparkling aura, so lose and messy is fine.  Trim the pin and round it to form a loop at the top of her head that will be used to dangle her in the bottle.


The wings were made with Sunkissed Fantasy Film from Art Glitter and glittered with Blue Agnel UF Pearlescent, Purple Lame UF Opaque, Crystal UF Transparent, Horizon UF Transparent.  There are links to great youtube videos on the Art Glitter website for working with Fantasy Film and Glittering butterfly wings.  I'll post the links at the end of this post as well.  After the wings are dry, bend them slightly and then glue them in place with more Designer Dries Clear Adhesive.

The bottle was decorated using Stazon Silver Ink and a flourish stamp.  When I stamp on rounded glass, I like to use clear stamps without an acrylic block.  After inking the stamp, I carefully place it on the bottle - holding it in place with one hand, while I tap it to go around curves with the other hand.  The nice thing about stamping on glass, is that you can remove it if it looks bad.  But don't stress too much about getting perfect stamps, because this flourish becomes a background and you don't notice it as much once you get the glitter on. Paint Designer Dries Clear Adhesive on the neck of the bottle and then sprinkle Crystal glitter onto that.  Then begin a free-form dotted scroll pattern by making dots of 3D Embossit on the bottle.  After each small section, stop to coat the dots with Crystal Glitter.  You want to be putting the glitter on while the glue is still white and looks wet.  Then make a simple dot pattern at the bottom with little trios of dots going around the bottom of the bottle - again using the Emboss it and sprinkling with Crystal glitter.  Once this is dry, use a soft brush to brush off the excess glitter.


Dangle the fairy inside the bottle by poking a hole in the bottle cap.  Tie clear beading wire to the loop at the top of the fairy's head and then bring the end of that that wire up thru the top of the bottle.  HINT:  tie a bead or something to the wire so you can drop it down the neck of the bottle from inside the bottle.   Once you have the thread coming out the top of the bottle, you can remove the bead, thread the cord thru the hole in the bottle cap and then put the bottle cap on the bottle.  Tie a crystal at the top to hold the thread in place and send the excess thread back thru the hole in the bottle cap.

NOTE:  If you don't have a bottle cutter but wanted to try this project, you could do this in a jar, or make your fairy small enough that you can put her in the bottle from the top.  Since the wings are Fantasy Film, they could be wrapped around the fairy to drop her into the bottle and they would fluff back out once they had room to unwrap.  (Make sure you have her tied onto the bead wire and don't let go, because once she's in there I don't think you'd be able to get her out!)

Supplies used:
Bottle
Bottle Cutter (see Diamond Tech Crafts)
White Polymer Clay
Eye Pin
Art Institute Glitter:
#183 Blue Angel Ultrafine Pearlescent, #157 Purple Lame Ultrafine Opaque,  #85 Crystal Ultrafine Transparent, #269 Horizon Ultrafine Transparent
Art Institute Adhesives:
Designer Dries Clear Adhesive
3D Embossit
Art Institute Fantasy Film and Fantasy Fiber:
Fantasy Film - Sunkissed
Fantasy Fiber - Bellflower

Helpful Links:
How to glitter a butterfly: http://artglitter.com/retail/Rrainbowbutterfly.html
How to make a Fantasy Film Dragon Fly:  http://artglitter.com/retail/rfantasyfilmdragonfly.html

Friday, May 4, 2012

Get your Summer On


My daughter is not your average 8-year old girly girl.  In fact, we are redecorating her bedroom in a Chicago Bears theme.  She would not be caught dead in anything pink, purple or the slightest bit frilly.  So this "Get Your Summer On" canvas is for her.  The stamps used here are from the "Hey Life" stamp set that was featured in yesterday's blog hop.  When she saw this stamp set, she couldn't wait for me to get it mounted so that she could do something with the skate boarder.  (I did make her wait until I got my project completed)  But stamps like this - that have a little bit for every taste - are even getting my little tomboy into stamping!!

For this canvas, I started by painting a sun-streaked background in various shades of yellow, orange and a little red acrylic paint - working from the upper corner and fanning out.  Then I dabbed some paint in the top corner and sprinkled with gold embossing powder while it was still wet.  I heat set the embossing powder to create a little glitter and texture.  Then I stenciled a white pattern around the border.  The stamps were done in Black so that I could go over them with a fine-tip black marker.  The texture of the canvas makes it tough to get full coverage with your stamp, but by filling in with marker, you can still create a nice sharp design.

After the stamps - the rest is just embellishing....Some swirled black "pearls" to create movement for the skateboarder and cyclist.  Stickers for the letters - with the "SUMMER" covered in Art Glitter.  Finally, I added the flowers, bugs and acrylic "sun".

To see this stamp and the other May releases from Red Rubber Designs, visit the New Releases page at Red Rubber Designs.

Thursday, May 3, 2012

New Stamp from Red Rubber Designs!

The Red Rubber Design team is Hoppin' again! Beginning today, we will introduce new stamps on the first Thursday of every month, with a blog hop and PRIZES. It's a fun way to see what's new at RRD and see what the team is doing with some of the new stamps. For today's project, we were all to use the bicycle lady from the "Hey Life" stamp set. Now, let me start by saying that the bicycle lady is not nearly as scary as Almira Gulch (A/K/A the Wicked Witch of the West), but I thought it would be fun to use her in this Oz inspired canvas. (Fun fact...while looking up the character's name, I discovered that you can download that bicycle lady's theme song for your phone. I can think of several people I might want to assign that ring tone to :)

But, back to the project...This is a 5 x 5 canvas. The background was done by sweeping Charcoal Palette ink across the canvas to create the dark sky, the horizon, the tornado and antique the edges. I used a little (very little) alcohol ink on a dobber to brush in a little green for the grass areas and a little greenish tint for the sky. The dirt path was done with Copic markers and a blending pen.  The bicycle lady was then stamped in black ink.  A little about stamping on canvas....#1 dainty, highly-detailed stamps don't work well on canvas because of the texture.  #2 be sure to put a block or something behind the canvas to provide a hard surface to stamp on as the canvas will give in the middle.  Acrylic stamp blocks work nicely for this.  #3 if you are looking for a sharp impression, you will need to fill in the voids caused by the canvas texture.  In this case, I went back and filled in with a fine point black permanent pen.  The bicycle lady has a nice flourish pattern on her dress, but since I had done the background first, it showed thru the dress and looked a little odd, so I filled that in as well.  Then I used the black pen to add "rotation" to the tornado, some trees and grass along the path.

Now - for the blog hop info - please visit all of the design team posts to see everyone's project with this stamp.  You'll also pick up valuable information that you'll need to enter for the prize package.

The Bicycle Lady needs a name - and we need your help to find it! Each blog on the hop (except the Red Rubber Designs Blog) has one of the letters of the Bicycle Lady's name somewhere in their blog hop post. Once you find all seven letters (that's a hint!) put them together to form her name. You may have to rearrange them a little bit!

Note: The letter you need from each blog will be obvious if you read carefully.... it looks just a little different from the rest of the letters!

Once you figure it out, email the name to contest@RedRubberDesigns.com and be sure to put yourname and email address in the email with the Bicycle Lady's name. Every correct answer will be entered into a drawing for the featured stamp set - "Hey Life" - and one winner will be chosen at random. Good luck!

Contest ends Sunday, May 6th at Midnight (US-CT).

Red Rubber Designs is releasing EIGHT more stamp sets for May's First Thursday! Here is one of them


                                                                  "Just Bee-Cuz"

Want to see more??  Visit each of the blogs on the hop!  And...come back to this blog tomorrow to see more from the Hey Life stamp set!

Red Rubber Designs
Sarah 
Paula-Kay
Louise
KC  (You are here)
Kate
Diana
Debra