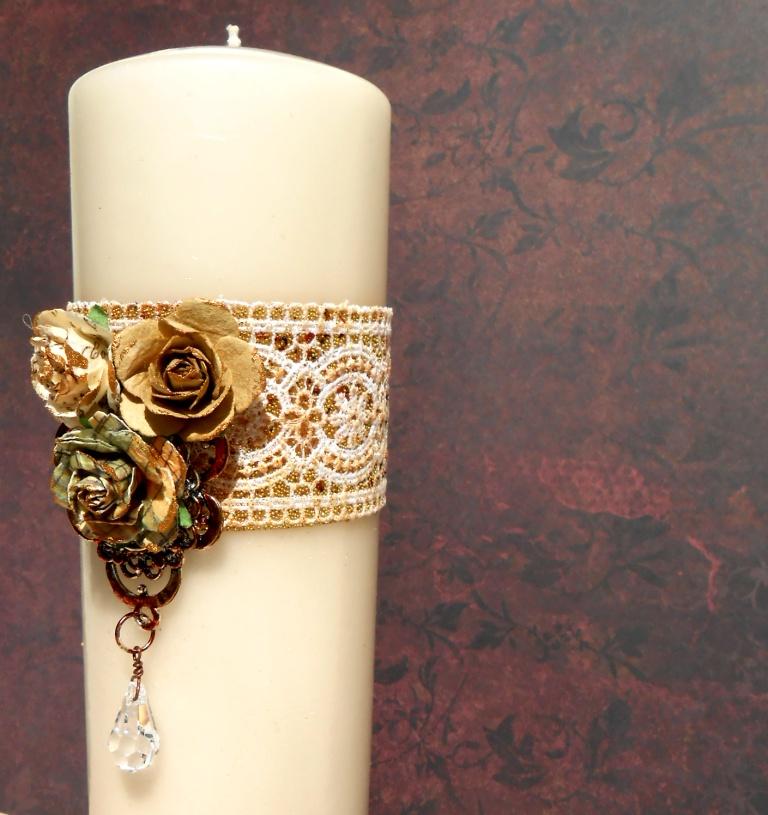
The Supplies:
-Tall pillar candle
-Wide lace that will go around the candle - this was left over from a spool of lace that I had from Hobby Lobby, but since you only need about 6" or 7", you can probably find this in your stash or possibly the remnant bin at your favorite craft or fabric store.
-Ranger Distressed Inks -Shattered Straw & Antique Linen
-Double sided tape - cut the same length and width as the ribbon
-Pastry Liners or Cupcake Liners

-Art Glitter Small Beads - #80 Solar
-Art Glitter Ultra Fine Opaque Glitter - #65 Old Gold
-Soft Brush or Make-up Brush
-Ornate Cameo or Pendant Blank - this, again, was from my stash, but you can probably find something at a thrift store, yard sale, or check out the findings from Vintaj. Just be sure it has an opening at the bottom to attach your crystal.
-Prima Flowers
-Connie Crystal Raindrop crystal
-Eye Pin
-Jump ring
-E6000 glue


3. We're going to do three layers of "inclusions" into the face of the tape. The first is the Art Glitter Elements. Pour some out into a pastry liner or cupcake liner. Beginning at one end of the lace, press the lace face down into the Elements. Lift and repeat all the way down the length of the lace. Elements are very chunky and some of the chunks are too big for this project. Brush the larger pieces off the lace with a brush or your finger. You just want some of the smaller pieces to stick to add texture and deep color. Pour the excess Elements back into the jar.
The second layer will be Art Glitter Small Glass Beads. Pour some of the beads into a pastry liner and again press the lace, face down, into the beads, so that they fill in more of the areas where there is no lace. Tap the lace over the pastry liner to remove excess beads. Pour the leftover beads back into their jar.
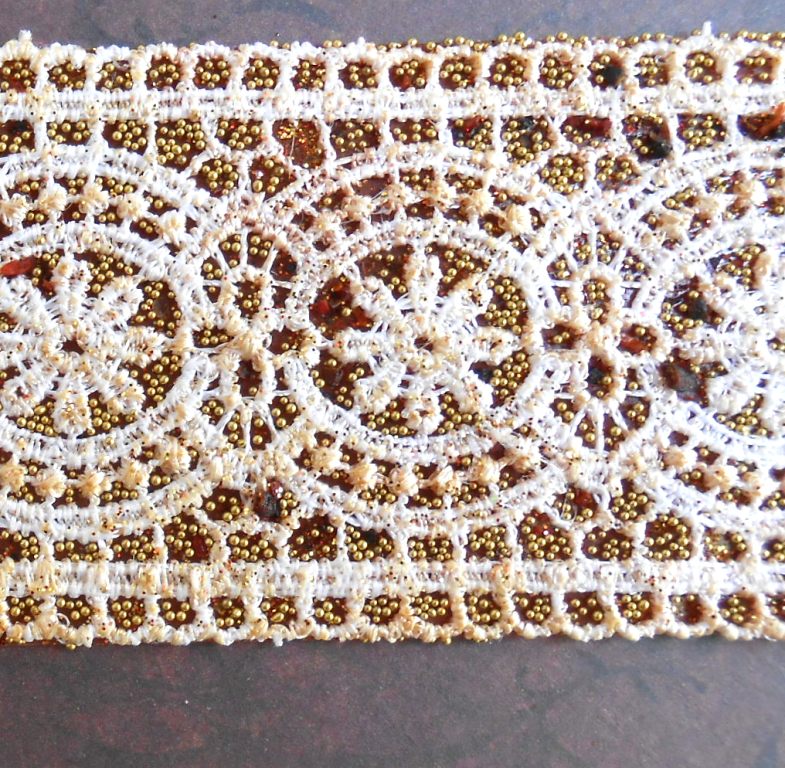 The third layer is the Art Glitter Ultra Fine Opaque glitter. For this layer, hold the lace, front side up, over a pastry liner or card stock, and pour the glitter over the lace. The glitter will fill in the areas that the Elements and Beads did not cover. Use a brush to press the glitter into any remaining exposed tape. Tap the excess glitter back into the pastry liner. Use a soft brush or make-up brush to brush off any excess glitter that may have temporarily stuck to the lace.

6. Use E6000 to glue a Prima Flower to the center of the pendant. Once that has set, use E6000 to glue the pendant in place on the lace and add more flowers at the top of the pendant.


Oh So pretty and elegant KC!
ReplyDeleteHow creative. I love it. I may use this in a Fall theme for my Oct. Fest party. Thanks!
ReplyDeleteNice way to dress up a ho-hum candle!
ReplyDeleteGorgeous work, KC!
ReplyDeleteVery pretty - this would make an excellent gift!
ReplyDeleteThat is so cute, I would of never thought of that. I am definitely making me one or maybe a few! Lol solar installer
ReplyDelete