Thursday, August 30, 2012

Let it Snow! Let it Snow! Let it Snow!!!

I'm finishing out Red Rubber Designs' Christmas in August with my favorite winter theme - Snow!  Growing up in Chicago, it seemed like we had constant snow from November through March.  It's actually one of the things I miss most.  If it's going to be cold, it might as well be white!


For this mixed media board, I started with blue paper from the Sands of Time Cardstock Collection - tinted with blue and purple alcohol inks.  I used Red Rubber Design's "Snowflake" stamps and "Peace on Earth" stamps to create a background -  stamping a random pattern of snowflakes and "Peace on Earth" in Palette Inks - Charcoal and 
Beaux Arts  Blue.  Then I heat embossed some large snowflakes with silver embossing powder.  The letters for "Let it Snow" are from the Distressed Typewriter Bet Set and stamped in Beaux Arts Blue on pale grey card stock.  I finished with a few snowflake do-dads that I had in my stash drawer.  (and yes, do-dad is the technical term)


Tuesday, August 28, 2012

Etsy Craft Party 2012 - Jamestown

August 24, 2012 was designated by Etsy as Craft Day 2012.  Craft parties went on world-wide in an effort to remind people how fun it is to get together to do something creative.

We had a small party in Jamestown, but a good time was had by all.

Everything was organized and ready for the guests to arrive.  We were doing a mixed media board and used papers from Red Rubber Designs - Amberley Grace  and Hemingway paper stacks.  I had cut the papers to size and die cut flowers from the papers, so that everything was ready to mix and match.  We used pages from Want 2 Scrap Grand Chipboard Album - Label One as the base of the project.


And everyone poured over the papers to make sure they had just the right combination for their projects. I may have provided too many choices...this step took a little while :)


I think they younger girls would have spent the whole night sorting through my button stash.  What is it about kids and buttons?


Once everyone picked their pieces it was time to get to work.  It was fun to watch every one's crafting styles.  Some people were very serious about getting everything perfect.


Others were relaxing and letting their "creative juices" flow.


In the end, every one's projects turned out a little different, but all were spectacular!  I failed to get pictures of all of the finished projects, but a couple of the girls posted theirs, so I have borrowed their pictures.

Great job ladies!!

A special thank you to Red Rubber Designs, Art Glitter, Michael's, and my friend Rick at GCG for helping us out with supplies for the party!  and to my big sis for letting us use her place for the party!!

If you are in the Jamestown area and are interested in taking part in future craft parties, leave me a comment and I'll make sure you know when the next one is.  If you're not in the area, check Etsy or Meetups to see if there are events in your area.


Thursday, August 23, 2012

Snowflake Pendant

Christmas in August continues at Red Rubber Designs.  For this project I've used one of this month's featured stamp sets - Snowflake Set.

To make the pendant, I rolled out purple polymer clay and pressed my pendant setting face down into the clay to mark the outer border.  Then I stamped the snowflakes, without ink, into the clay.  To fill some of the empty areas, I used a dull pencil and added extra dots.  Then I used a clay blade to cut the pendant just inside the guide marks I had made with the pendant setting.  After baking the clay, I rubbed the surface with a rub-on silver, leaving the recessed snowflakes in purple.  I finished by gluing the clay into the setting and adding a jump ring and cord.

Christmas continues all month at Red Rubber Designs, but Pam's Birthday Sale only goes on for four more days!  Hurry and take advantage of some great deals!  50 items are marked at 50% off!  Free shipping for orders over $50.00 (continental US) and $5.00 shipping on orders under $50.00.  Plus all stamps have been marked down!


Wednesday, August 22, 2012

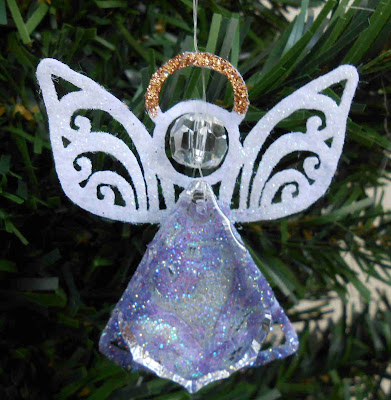
Little Crystal and Glitter Angel

I've been trying to keep up a Christmas theme on my blog this month, so this little angel was created as a Christmas ornament, but she would make a great guardian angel to hang from a rear view mirror anywhere else she might catch a little light.  This is a super easy project and would be a great project for kids too.  How cute would these be as teacher gifts this Christmas?

I used:  Felt angel from Creative Impressions Felt Ornament collection, Art Glitter Dries Clear Adhesive, Art Glitter Ultrafine glitter in Horizon, Angel Dust and Leather, Connie Crystal Beads: 1.5" French Cut, and 10mm Round.

I began by using a make-up sponge to dab the adhesive onto the "dress" area of the felt angel and then coated it with Horizon glitter.  I then dabbed adhesive on the wings and coated with Angel Dust glitter.  The halo was then done in Leather glitter.

I brushed the back side of the French Cut Crystal with the adhesive and positioned the felt on top - glitter side down - so that the top of the crystal lined up with the top of the dress section.  

I covered the backside of the exposed adhesive with Angel Dust glitter.

Once the adhesive was dry, I ran a clear beading wire through the hole at the top of the French Cut Crystal and ran both ends of the wire up through the 10mm round bead. 

 I tied the wire around the halo to hold the bead in place and then tied a knot at the end of the wire to form a loop for hanging.

I love the way the crystal magnifies the glitter behind it!  I think I'll be using this on more projects!

Have you checked out the new Connie Crystal Website and Blog?  The Connie Crystal design team posts a variety of crystal projects with great tutorials and "how to's".

And don't forget....if you have a store, you can set up a wholesale account with Connie Crystal!  If you don't have a store, Connie Crystals are available on Amazon!!


Happy Birthday to Pam!

It's Pam's Birthday!  So she's celebrating with a sale at Red Rubber Designs!!


Starting on Wednesday (Aug 22), Red Rubber Designs is having a sale which includes the following:


* 50% OFF of 50 Items for 5.0 days

* FREE Shipping on orders $50 and over (USA only)

* $5.00 Shipping on orders under $50 (USA only)

* ALL stamps are reduced in price

Visit Red Rubber Designs to take advantage of these great deal!!

Visit Red Rubber Designs on Facebook to wish Pam a very Happy Birthday!

Saturday, August 18, 2012

Glittering Snowflake Ornament

By far, of my favorite theme is Holiday decorating is snowflakes!  Today I'll be sharing one of what, I'm sure,  will be many snowflake-themed projects.  This is a super quick and easy project, not to mention fairly inexpensive.  These snowflakes are great as ornaments, embellishments for cards or layouts, or tie them onto your packages for a little extra pizazz.  Of course, the ornaments are cool, but glitter makes them great!

For this project I used:  a Snowflake from Clear Scraps Mini Snowflake album, Sizzix Snowflake Embossing folder, Sizzix Big Shot embossing machine, Art Glitter Designer Dries Clear Adhesive (DDCA), and Art Glitter Ultra Fine Transparent Glitter - #86 Angel Dust.


Begin by placing the acrylic snowflake in the embossing folder so that the snowflake pattern is centered on the acrylic.  Run it through the Big Shot.

After embossing, remove the protective plastic from both sides of the acrylic.  Placed the snowflake on your work surface so that the embossed snowflake is face down and the recessed snowflake is face up.  Using a fine metal tip on your DDCA, begin filling the recessed areas of the snowflake

If you work quickly, you can fill the entire snowflake with adhesive and then cover with Angel Dust glitter.  If you work slowly, stop after one or two sections and add the glitter so that you can be sure your glue is still wet and the glitter will adhere properly.  Shake and tap off the excess glitter.
Run a line of DCCA around the outer edge of the snowflake and sprinkle on more Angel Dust glitter.

Lie flat to allow adhesive to dry thoroughly.  The glue is still wet and milky white here.

Once the glue dries, the glittered areas are much more translucent - like a crystal snowflake.  Add a ribbon for hanging.

This is another snowflake ornament that I have made using Art Glitter and Clear Scraps Acrylic.  It is a larger and slightly more involved project.  The full instructions are on the Art Glitter Blog today.  Please go check it out!  


Thursday, August 16, 2012

August "Just Because Challenge" - Red Rubber Designs

I can't believe it has been a  month already since Red Rubber Designs had their first "Just Because Challenge".  But here it is....time for another one!

Play along with the challenge and upload your project to Red Rubber Designs Flickr Group for a chance to win.  Two randomly chosen entries will win 10.00 gift certificates.  Aside from the prizes, this is a great way to show the world your wonderful work and the projects you've created using Red Rubber Design Stamps.

For the August Challenge:
This will be a "recipe" challenge.
The recipe for your inspiration piece will be to:

Use 1 stamped image as your focal point.
Use 1 sentiment
Use something sparkly
Use ribbon

Be sure to tag your project once you've uploaded to flicker!!  JB0812 is the tag for this month.

Here is my project:  

For the focal stamp (the dove) I used one of this month's Featured Stamps - "Brushed Christmas."  The Christmas Trees also came from this stamp set.  These stamps were stamped in embossing ink and embossed with pearl embossing powder.  The sentiment also comes from one of the Featured Stamps - "Peace on Earth".  For my "something sparkly", I made a glittered background using sticky paper and dark blue and white Art Glitter.  

I hope you'll play along with the challenge!  For full details, please visit the Red Rubber Designs Blog!

Thursday, August 9, 2012

Retro Christmas Card

Christmas in August continues at Red Rubber Designs.  Have you checked out all the great Christmas stamps that are featured this month?!  For this card I used a mix of Christmas stamp sets:  "Peace on Earth" for the sentiment, "Gift for You" and "Mister Penguin".  I love the retro look of the packages, so I went with a retro color combination of crimson red and olive green.  The penguin was stamped on white card stock, colored and cut out to give it dimension and the feeling of running through the aisles of Macy's on a last minute Christmas shopping spree!  (See how flushed his cheeks are?!)  The packages were stamped in Moulin Rouge and Jardin Moss from Palette Ink.

Join in the holiday spirit all month at Red Rubber Designs!  Next week is the "Just Because" challenge.  Post your project on Flicker for a chance to win!!

Wednesday, August 8, 2012

Connie Crystal News

If you follow my blog, you've seen a number of projects using Connie Crystals, but if you shop the big box craft stores, you may not be familiar with this brand.  Well, there is great news for anyone that would like to get their hands on these fabulous crystals!

First, the new and improved website is up and running!  Visit ConnieCrystal.com to check out the product line and see stunning projects made with the crystals.  If you have a business and a resale number, you can set up a wholesale account and buy directly from the site!!

Don't have a business?  No problem!!  Connie Crystal is now available on Amazon!!  This Link should bring you to a three full pages of Connie Crystal available NOW!

Last, but certainly not least, the Connie Crystal Blog is now up and running and features tons of projects with great tutorials!  One of my favorites is featured today (wink)! The design team has been busy filling the blog with a huge variety of projects from paper crafting, to jewelry, to home decor and more.  Go Team Sparkle!!  There is no end to the ways you can incorporate these beautiful crystals into your crafts.  Go get your Sparkle on!

Saturday, August 4, 2012

Glittering Christmas Light Ornament

The other day we were driving in downstate IL and lost the radio station we had on, so as I searched the stations the one I stopped on said something about Christmas in July.  Silly me....I thought maybe they were advertising a craft sale or something...nope...they were playing Christmas music!  As crazy as I thought that was, I seem to be in a Christmas crafting mode.  Maybe I won't have such a mad-dash-scramble on December 24th if I start now!  So today I'm sharing a glittering Christmas ornament.

For this project I used Art Glitter Ultrafine Opaque glitters:  #1 True Red, #65 Old Gold (my favorite!), #48 Emerald, #140 Canadian Blue, #79 Black, and #110 Taupe.  I also used a 3" diameter frosted glass Christmas ball (2" or 2 1/2" will work just fine too) and Art Glitter Designer Dries Clear Adhesive (DDCA).

Began by lightly penciling a twisting, turning line around the ornament that will form the cord for the Christmas lights.  Once you are satisfied with the line, trace over it with a thin black Sharpie.

Using a metal fine tip on the DDCA, trace over a section of the "cord" and then cover the section with black glitter, tapping the excess onto a clean piece of card stock or into a pastry liner.  Move on to the next section, working in sections of about 3" at a time, until you have completed the cord.  Some of the excess glitter will cling to the ornament.  Set the ornament on a shot glass or small paper cup to dry.  Pour the black glitter that you've collected on the card stock or in the pastry liner back into the jar of glitter.

Once the adhesive has dried, brush off the excess glitter.

Beginning with one of the colors - I started with Red - draw small teardrop shapes in glue along the cord and cover with glitter and tap off the excess.  You'll want the fat end of the teardrop close to the cord.  You'll also want to space them out so that once you've come back with the other 3 colors you'll have a random pattern along the cord.  Leave a little bit of space between the "bulb" and the "cord" that will be filled in later.

Once you've gone all the way around with the first color, repeat with the second, third and fourth colors.  (Gold, Green & Blue).  

Set aside to dry about 30 minutes and then brush the excess glitter from the ball.

Connect the bulbs to the cord by adding a dot of DDCA and covering with Taupe glitter.

Tips and Tricks:
 -The cap and hanger on these ornaments can be kind of lose.  Before you start, remove the cap, run a bead of DDCA along the top of the glass bulb and re-attach the cap.  Once dry, it will give you a nice secure place to hold your ornament and keep your fingers out of your design.

- Keep a shot glass or small paper cup handy to set your ornament on to dry between steps.

- Keep your design around the "belt line" of the ornament - leaving the bottom blank and a space at the top blank.  This will give you spaces to hold onto your ornament while you work so you don't mess up the design.  While I'm working on the ornament, I hold it in my left hand, with my thumb at the bottom and first two fingers up on the cap.

Visit the Art Glitter blog for another glittering Christmas project!  

Thursday, August 2, 2012

Red Rubber Designs - August Blog Hop

It's Christmas in August at Red Rubber Designs!!  

I've created a little Christmas Decor using a page from the Maya Road Sheer Round Coasters.  It was tinted with a little green alcohol ink and then I used permanent ink in red and green to stamp the wreath, pine branches, and spattering of stars from the "Holiday Wreath" stamp set.  I cut a smaller circle of beige card stock and trimmed it with a decorative edge trimmer.  This was glued in place behind the coaster to help the wreath in the front stand out.  This also enhances the tinted color on the acrylic.  I stamped the sentiment on a piece of the same beige card stock - edged with a red Copic marker and spritzed with gold shimmer spray.  I finished with some ribbon, rhinestones and little Christmas Tree brads.


Hop Details:

It looks like one of Santa's elves has been causing a little mischief in the workshops and craft areas of our Design Team members. Look closely at each project on the hop and you will see that said elf has left a little image of his jolly employer on one of the Design Team member's creation.
Find the picture of Santa then let us know where you found it (whose blog).
Email your name and the name of the blog where you found the picture of Santa to contest@RedRubberDesigns.com .
Every correct answer will be entered into a random draw for the Spotlight Stamp Holiday Wreath.
Contest ends Sunday, August 5 at midnight (CDT). Good luck.

Red Rubber Designs http://blog.red-rubber-designs.com/ (There will be a post with contest details)
Sarah
Paula-Kay
Louise
KC (You are here)
Kate
Diana