Wednesday, October 31, 2012

Clear Scraps Haunted Castle

Happy Halloween All!!

When I was a kid my favorite scary movie was Abbott and Costello meet Frankenstein.  I actually re-watched it last week....too funny!!!  I thought it was so scary when I was younger - now the only thing I find scary is the acting!

But I was still inspired by the classic black & white horror flicks to create this Haunted Clear Scraps Castle.  It was on the Clear Scraps blog last week, but in case you missed it, I wanted to share it here as well..

For this project I used Clear Scraps' Sandcastle Acrylic Album.  

When I originally got this album I had imagined something very frilly and sweet, but when I started to gear up for Halloween, this album just cried out to become a Haunted Castle.  And since my kids share my love of Halloween and odd sense of humor, I had a perfect set of photos to fill it with and keep the theme.

As luck would have it, I had recently left the lid off my Black Stazon Ink and dried out the ink pad.  This did not make me happy at the time, but it was perfect for creating the shadowed edges on the acrylic pages.  

After inking all the pages, my castle was already taking on a creepy look.

I went around each piece with a black sharpie to add more definition to each of the layers.

Then I took a fine-line Sharpie marker and added shingles and other architectural elements.  I am a natural-born doodler so this step was a lot of fun for me.  I may do an album just completely covered in doodles or Zentangles.  

Here's a closer look at some of the details.  If you are not a great doodler or free hand artist, here is a really great thing about Clear Scraps....THEY'RE CLEAR!!  I used a printed boarder for the square scroll pattern and simply traced it.  I also used a line grid behind the acrylic to make sure my shingles stayed fairly uniform or at least fairly straight.

The rest of the album was all about pictures.  I took some of the old Halloween pictures and edited them to black and white and printed some titles, years and captions in some fun fonts. 

There are a few splashes of color, like the red glitter "blood" on the Count's page.

I used some bling and ribbon trims from Want2Scrap and added Viva Decor Silver Pearl Pen "pearls" to accent the outline of the castle pages.

These Clear Scrap Albums are so much fun to put together!  I hope I've inspired you to try one!  

Be Safe and don't eat too much candy!!

KC


Wednesday, October 24, 2012

Upcycled Denim Rosettes with Crystal Centers

If you have kids, you know they go through jeans faster than anything!  My daughter is so hard on jeans that by the time she's done with them, they aren't even good enough to go to Goodwill.  So, as we cleaned out her drawer this year, I grabbed a few pairs of her jeans and created some upcycled projects to use some of the denim.  Here is one that I had done for Connie Crystal.

For this project I used:
Materials:  Denim from kid's old jeans,  Art Glitter Fabric Dries Clear Adhesive (FDCA), Art Glitter - (this was actually upcycled too, as it was excess glitter that had been collected from previous projects - the fall off)  There was a lot of "Horizon" in the mix that is a nice blue/purple denim color.  Two Connie Crystal 14mm Octagon AB Beads, E6000 Glue, Blank Headband, Ring Blank, Double Face Tape.

Tools:  Sizzix Big Shot, Sizzix Bigz Die - 3D flowers, Scissors

Begin by cutting a section of denim large enough to cover the Sizzix Die (about 5" x 6") and run the denim and die through the Sizzix Machine

Follow the instructions with the die to roll the flower pieces into rose buds  Glue the end tab in place with FDCA, and hold in place for a few minutes for the adhesive to grab hold.  Due to the size of the small rose and the denim beginning to fray slightly, the center of the small rose may be kind of "mushy".  Not to worry - We'll be covering that up later.

Take another section of denim (about 4" x 6") and cut a random wave pattern across, then a strait line, then another wave, so that you have 4 sections that all have a straight edge and a wavy edge.  Vary the width so that you can use the wider pieces for outer petals of your rose and work inward to the more narrow sections.

For the large rose, cut a 1 1/2" square of denim and double face tape, then trim the corners to form an octagon.  For the smaller rose, do the same with a 1" square of denim and double faced tape.  Remove one side of the tape protector and press the tape onto the matching denim octagon.  Remove the other side of the tape protector to expose the tape.

Starting with the large octagon and the widest section of denim, begin attaching the "petals" to the tape octagon.  Lay the end down on the tape and then gather the denim and press down on the tape.  Work your way around the outside of the octagon until you get to the end of that piece of fabric.  Then use the next narrower piece to continue in a spiral around the octagon.  About two rows should be enough.  

Leave a section in the center of exposed tape and press the larger rose bud into this spot

Repeat with the smaller rose.  Depending on how much you gather your fabric, you may need to cut another strip of fabric for the small rose.  (I did)

Use a fine metal tip on the top of the FDCA to run a bead of glue around the edges of the petals.  This will be used to add glitter to your rose, but it will also help seal the ends so your rose doesn't fray too much.

Sprinkle glitter over glue while it is still milky and white.  Set aside to dry.

Once dry, brush or shake off excess glitter.  Use FDCA to attach Connie Crystal octagon crystals to the centers of the flowers.  If the fabric in the center of the rose causes the crystal to sit up too high, use small scissors to snip out some of the fabric from the center.  

You now have two beautiful denim roses to add to mixed media projects, scrapbook layouts, jewelry, purses or just about anything else.  I decided to make a ring and headband from mine.

I used E6000 to glue a ring blank to the back of the small rose.  This denim "cocktail" ring is very soft and light-wight and unlike large metal or plastic rings, it doesn't get caught on everything when you're wearing it.  

I used E6000 to attach the large rose to a headband blank (found at Hobby Lobby)


And since they are denim ....I now have a set of accessories that will go with just about anything.

Thanks for stopping by!
Please visit the Connie Crystal blog for another upcycling project - made just a little prettier with crystals!

KC


Monday, October 22, 2012

Clear Scraps Football Banner - Go Bears!!

Today I wanted to share a quick Clear Scraps Football Banner.  For this I used Clear Scraps 5 Piece Banner pieces with the Football Helmets from the Mini Albums.

For each of the helmets, I selected a patterned paper in orange and blue tones and traced and cut the paper for a background - attaching it to the acrylic with Zip Dry Adhesive..  (I'm a Chicago Bears fan, you'll want to pick colors for your team)

I used some foam sticker letters in white to spell out the team name.

On the banner pieces, I attached a 2" strip of patterned paper across the pennants, leaving some acrylic showing at the top and bottom.  I stamped on the back of the banner pieces with Stazon Ink and bubble wrap to create a pattern in orange and blue. Stamping with bubble wrap is one of my favorite ways to create a quick background pattern.

I colored in the face masks with a silver metallic Sharpie and used Zip Dry Adhesive to attach the helmets to the banner pieces.  I finished by embellishing with some Bears/Football stickers and blue and orange ribbon.

Create a banner of your own to support your favorite team!  

Check out the Clear Scraps store for more banner shapes and sizes, and lots of other fun acrylic products!

And please go check out the Clear Scraps Blog!  

Here's a sneak peak of my post on the CS Blog today:


Saturday, October 20, 2012

Paper crafting Piccolo Pendant

I love when I can use papercraft products for other projects.  Globecraft Memories has introduced a line of Piccolo products that are perfect for this.  They are small and dainty and are great as embellishments for cards or layouts, but they also make fantastic jewelry pieces.  This week Art Glitter has teamed with Globecraft Memories to create fun and beautiful projects.  Check them out on the Art Glitter Blog!

For my project, I used:
Piccolo Vintage Lock & Key Necklace Set
Piccolo Enamel Powder Adhesive
Piccolo Enamel Powders - Enchanted Aubergine & Victorian Bronze
Piccolo Easy Grip Tweezers
Art Glitter Designer Dries Clear Adhesive (DDCA)
Art Glitter Ultrafine Glitter - #79 Black
Round Jumprings - gunmetal
Oval Jumprings - antique bronze
Leather necklace cord

Begin by separating the Piccolo pieces from the packaging board.  A craft knife is helpful to get some of the tiny pieces out.  Piccolo charms are made from book board which makes them strong but flexible.

Use the Enamel Powder Adhesive to coat one side of a Piccolo piece.  Do not squeeze the bottle - just use the dobber top to cover the piece.

While the adhesive is wet, cover with Enamel Powder.

Hold carefully with tweezers, and shake off the excess powder.

Use a heat gun to heat set the powder.  I love this vintage, hammered metal look!

Repeat this process on all of the pieces.  On the large base piece and the keys (not pictured here....oops!), you'll want to do the front and back.  The other pieces will be glued down so it is not necessary to do the backs.

Use DDCA to cover an oval in the center of the base piece leaving a nice boarder around.

Cover the DDCA with Black Ultrafine glitter.  Shake off the excess.  The black will add contrast between the two metallic colors, while also adding some rich sparkle.

Use a toothpick to add DDCA to the back of the tiny flourish pieces and glue them in place.  For the doorknob, glue the two smaller circle pieces down on top of each other and the embossed larger circle on top.  (Note that I did not emboss the smaller circles since they won't show)

Once the glue on the glitter is dry, use a toothpick and DDCA to glue your pieces in place as desired.  I opted to angle the brass piece rather than centering it, so I only ended up using one of the larger swirls.  I'll just save the other one for another project.  The keys are attached to the bottom with round gunmetal colored jump rings.

I used three antique brass colored oval jump rings to hang the pendant from a black leather cord.

Check out the Art Glitter Blog for more glittering fun!!


Tuesday, October 9, 2012

Glittered Acrylic Snowflake

I'm beginning to gear up for Christmas with an acrylic snowflake ornament.  For this project I used:

Clear Scraps Acrylic Snowflake from the Gingerbread Banner set,  Sizzix Embossing folder and Big Shot, Art Glitter Designer Dries Clear Adhesive (DDCA), Art Glitter Ultra Fine Opaque - #268 - Horizon,  mix of coordinating papers, Sizzix Bigz Die - Tattered Flowers, Connie Crystal - Octagon Crystal AB, Want2Scrap Beautiful Bling Borders - Fancy Waves

Begin be tracing the snowflake onto your background paper and cut paper to fit.  This paper is from Kaisercraft.  Set the paper aside for a bit.

Place the snowflake in embossing folder and run through the embossing machine,

Remove the protective plastic from the backside of the acrylic, fill the recessed areas of the design with DDCA and cover with Art Glitter.  Shake off the excess.

Once the adhesive has dried, turn the snowflake back over and use DDCA to glue the cut paper to the back of the acrylic.  You only need a little glue - I put a drop at the end of each arm of the snowflake and a little bit behind the embossed area.

Run coordinating papers through the die cutter using the Tattered Flowers die cut.

Spritz the paper flowers with a little bit of water.  Use a toothpick to round the ends of the petals.  Let dry.

Assemble the flower by layering alternating papers and gluing each in place with DDCA.  


Use DDCA to glue Connie Crystal octagon bead to the center of the flower,


Finish by gluing adding Want2Scrap bling to each of the tips of the snowflake.  (don't forget to remove the protective plastic from the front of the acrylic, if you haven't already!)  Glue the flower in place.  Punch a hole in the paper at the top (there is already a hole in the acrylic) and add an eyelet.  Tie silver ribbon in place for hanging.

Visit the Clear Scraps blog for more great acrylic projects!

Monday, October 8, 2012

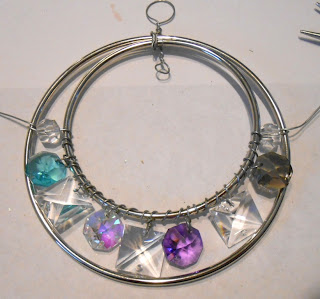
Connie Crystal Sun Catcher


I love the way Connie Crystals catch the light.  I have created a dazzling sun catcher to hang in one of my favorite places.  I used:

Silver tone metal rings - 1- 3" and 1- 4" - found near the macrame and kid craft area of Hobby Lobby
20 gauge metal wire
4 - Connie Crystal Octagon Crystal Beads - 1 each: Aqua, Purple, Grey and Crystal AB
3 - Connie Crystal Clear Square Crystals
2 - Connie Crystal 8mm Round Clear Beads
1 - 40mm Sunburst Crystal - from Connie Crystal

I began by laying the rings and crystals out to figure out spacing and then took a sharpie marker to mark approximately where the holes from each bead were on the inner ring.

I cut off about 2 feet of wire and strung a square crystal to the center of it.  I gave the wire a couple twists right above the crystal.  This is the center crystal, so I placed it at the center marking and began wrapping the wire around the metal ring to the right and left until I got to the next sharpie marks.


I worked up the right side first, adding a crystal bead at each sharpie mark.  Then I came back and did the beads to the left the same way.


I created a hanger by making a larger loop for hanging and then a smaller loop at the bottom that will eventually hold the large focal crystal.  I then wrapped this wire piece around the two metal rings to connect them and hold them in place.  

To further secure the two rings together, I added an 8mm round bead to each of the lose ends of wire and then wrapped the wire around the outer ring several times before trimming the excess off.  The final step was to create a wire loop for the large sunburst.  I then used a small jump ring to hang the crystal from the wire at the top.  

Please visit the Connie Crystal Blog to see more tips, tricks and inspiring projects using Connie Crystals.